umIToolbox (main GUI)
The umIToolbox main graphical user interface (GUI) allows one to create and manage a project and its datasets, configure and run analysis pipelines and launch visualization apps.
Syntax
umIToolbox: Opens an empty interface. Create or load a project file from the interface to use the GUI.
umIToolbox('C:/PATH/projFile.mat'): Opens the interface and automatically loads the project stored in projFile.mat file. The input is a string with the full path to the project file.
Sections
- The interface: GUI elements and tabs contents.
- Advanced search: advanced object filtering tool.
The interface

Main elements of the umIToolbox app.
1. Menu bar
Project
- New: Creates a new project file. Here, you will be asked to create a project name and to select the save and the raw data folders as well as to select the protocol function associated with the raw folder structure. For more info on how to create a project file, see this tutorial.
- Open: Opens dialog box to load previously saved project file.
- Save: Saves the currently opened project file.
- Save as...: Opens dialog box to save currently opened project file.
Utilities
- Project >>
- Look for new data: Scans the raw directory for new/deleted recording folders.
- Update Project >> Updates the save folder subdirectories when changes are made to the raw folder (i.e. new/deleted recordings).
- Full update: Updates the save folder after any changes in the main folder
- Add new data only: Updates the save folder with new recordings and ignore missing ones.
- Set Raw directory: Edit or add new raw directories to the project file.
- View LogBook: Shows a table (data from LogBook.mat file in the save directory) with all operations performed in the data so far.
- Reset LogBook: Erases the LogBook table.
- Restore garbage list: Erases all objects listed in the garbage list. For more info on this topic, see our tutorial on how to manage the experiment data.
- Merge recordings: Merges the data from two or more recordings.
2. Search tool panel
Provides options for filtering the data shown in the object tree.
- Advanced Search: Launches an interface to filter the project items (Subjects/Acquisitions/Modalities). For more info read the Advanced Search section.
- Reset Search: Resets the object tree to show all items of the project.
3. Tab's options panel
This panel displays options for each tab. The content of the options panel changes depending on which tab is selected. For details on each tab option, read the respective tab documentation in section 5.
4. Project's object tree
Shows a tree containing the file structure of the project save folder. The tree behaviour changes depending on the selected tab. Dashboard and Visualization tabs allow single-item selection while the Pipeline control panel and Analysis tabs allow multi-selection.
5. Tabs
Here are the links to the documentation of each tab:
- Dashboard (Experiment Management)
- Pipeline control panel (Automatic data processing)
- Visualization (Data visualization)
- Analysis (Visualisation of grouped data)
Advanced search
The Advanced Search GUI allows one to filter the object tree elements using query terms about objects properties such as a mouse's ID.
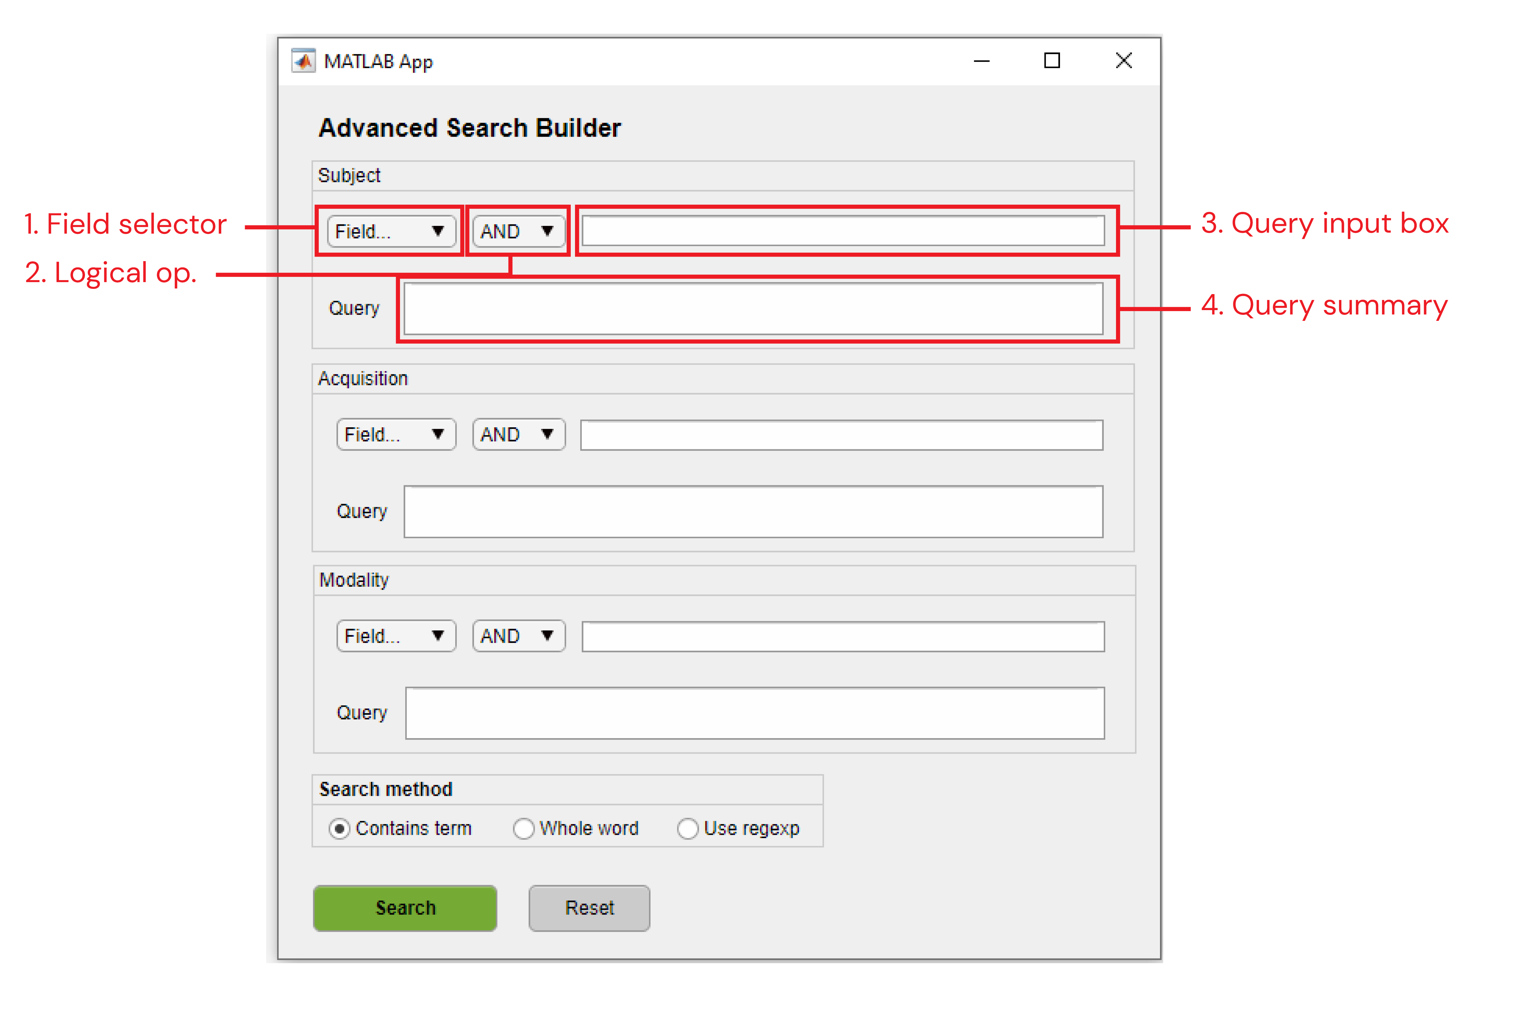
Advanced Search graphical user interface.
The Advanced Search interface is comprised of one search panel per object type (i.e. Subject, Acquisition and Modality) and a search method selector panel.
1. Field selector
List of the object properties to perform the search on.
2. Logical operator
Logical operator that will be used with a second query term. Includes AND, OR and NOT.
3. Query input box
Input box for the query terms. Type the term and press Enter to confirm.
4. Query summary
Shows the final query term that will be used to filter the objects. The syntax works as follows:
(Term1[Field1]) OPERATOR (Term2[Field2])
For example, to search for the terms "OD" and "ST" in the ID field, the final query will be:
(OD[ID]) AND (ST[ID])
Tip
The query summary field is editable. So if you made a mistake in the query input box, it can be fixed in the Query summary box given that the syntax is maintained.
Search method panel
There are three options for the search query:
- Contains term: searches for the term anywhere inside the field.
- Whole word: searches for the field corresponding to the exact query term.
- Use regexp: the search term is interpreted as a regular expression.
Note
Note that the Contains term and Whole word options are case sensitive!
In order to create a search query, follow these steps:
- First of all, select the object's property to query from the Field selector.
- Type the query term and press Enter. Type one term at a time and use the logical operators to add new terms.
- Once the query is completed (it should appear in the query summary box), click on Search button to filter the object tree in the main GUI.
Example of a query filter.