Event management tool
This tool is an Utility of the DataViewer app. The app is dedicated to the visualization and detection of events stored in the analog inputs from LabeoTech Imaging systems. It enables users to easily set the parameters for event detection either from internally generated events from the imaging platforms or from external sources such as TTL signals or photodiodes. Additionally, a list of event IDs stored in a .CSV or text file can be used to identify the detected events associated with different conditions. Finally, one can save the event information to an events.mat file, which can be used by some of the functions in umIT (e.g. split_data_by_event) to perform the analysis of event-triggered imaging data.
The interface
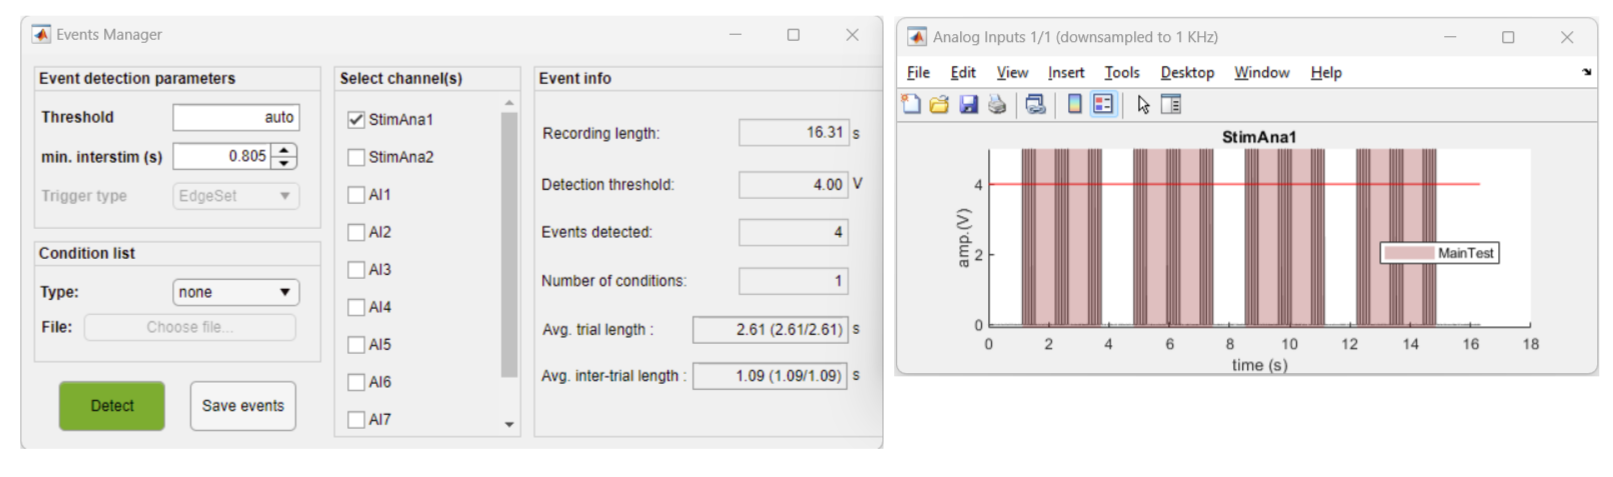
App's main interface (left) and analog input figure (right) showing the events detected (red shaded areas)
- Event detection parameters:
- Threshold: threshold (in volts) for detection of events. If set to "auto", the threshold is calculated as 0.8*max(signal).
- min. interstim (s): minimum inter-stimulation time period (in seconds). This parameter is used to put together a block of signal bursts as a single event. As shown in the figure above, each event consists of a series of three bursts with 0.7 seconds delay and an inter-stimulus (time delay between events) of 1 second. By setting a value between 0.7 and 1, we can successfully distinguish the individual blocks of bursts.
- Trigger type: types of triggers marking the beginning and end of an event. There are two types: EdgeSet (default) and EdgeToggle. The EdgeSet type consists of a rising and falling edges of a pulse marking the beginning and end of an event while the EdgeToggle represents a pulse at the start and another pulse at the end of the event (see illustration below).

- Condition list:
- Type: type of file containing the list of conditions. As of today, two types are available:
- CSV: this is the default file format. A .csv file should contain the condition IDs/names listed in chronological order with each row representing an event.
- Vpixx: file from Vpixx software (Vpixx Technologies) with extensions .vpixx or .txt.
- File: click to select the file containing the condition list.
- Type: type of file containing the list of conditions. As of today, two types are available:
- Select channel(s): click on the analog channel(s) containing the event signals.
- Select column(s): panel visible when a CSV file is selected. Click on the column(s) to identify the events.
- Event info: panel containing basic statistics on events detection.
- Detect button: applies the event detection parameters to the selected channels and generates the plots.
- Save events button: creates the file events.mat in the save folder.
Usage
To launch the tool, open the DataViewer app and go to Utilities >> Manage events. To access the Utilities menu, either open a .dat file (File >> Open) or import the raw data (File >> Import raw data... >> from LabeoTech system)
Tip
If you import the raw data, you can skip the event detection by setting the DetectEvents parameter to No to save time. The app will read the analog data and create the events.mat file later in the app.
1. Select the data folder
The app will automatically open the the binary files (ai_0000x.bin) containing the analog signals. If the files are not found, you will be asked to select the folder containing the files. Once the files are read, the app interface will appear. The save folder where the events.mat file will be saved is the same from the opened .dat file.
2. Select channel(s)
Select one or more channels from the list in the Select channel(s). The list of channels is based on the content of the info.txt file.
Note
If two or more channels are selected, for each channel, the events detected will be automatically considered as a condition, if no condition list is provided. For example, if there are events in the channels StimAna1 and StimAna2, the events will have a total number of two conditions with names StimAna1 and StimAna2.
3. Choose a condition file
This app provides a convenient feature for cases where the events detected are associated with multiple conditions. Users have the option to upload a .CSV file (or a text file from Vpixx-special case) that will be used to update the list of event names. This can be particularly useful when dealing with cases where there are different stimuli (i.e. conditions) presented in a random order.
CSV files
Users can prepare a .CSV file that includes the event names listed in chronological order with each event name in a separate row. Upon uploading the file through the app's interface, the app will process the contents and update the event name list accordingly.
To upload a .CSV file:
- Change the condition type to CSV
- Click on Choose file... button
- Select the .CSV file in the folder
The app will read the content of the .CSV file and update the event name list accordingly.
Special case: multiple columns
In cases where the .CSV file contains multiple columns, the utility app's graphical user interface (GUI) offers an additional panel to facilitate column selection. This feature allows users to choose the specific column(s) they want to include in the event name list.
By selecting two or more columns, the app concatenates the row values from each selected column to create unique event names. This functionality is particularly useful for users who have different combinations of parameters that form a unique condition. Additionally, if the .CSV file contains headers, those headers are automatically included in the generated event names. This ensures that the resulting event names accurately represent the parameters associated with each condition. Here is an example of a .CSV file containing three columns:
Here is the data in the .CSV file:
| Test | A | B |
|---|---|---|
| 1 | 1 | 1 |
| 2 | 2 | 2 |
| 3 | 3 | 3 |
| 4 | 4 | 4 |
| 5 | 5 | 5 |
And here is how it looks like when the data is loaded on the app:
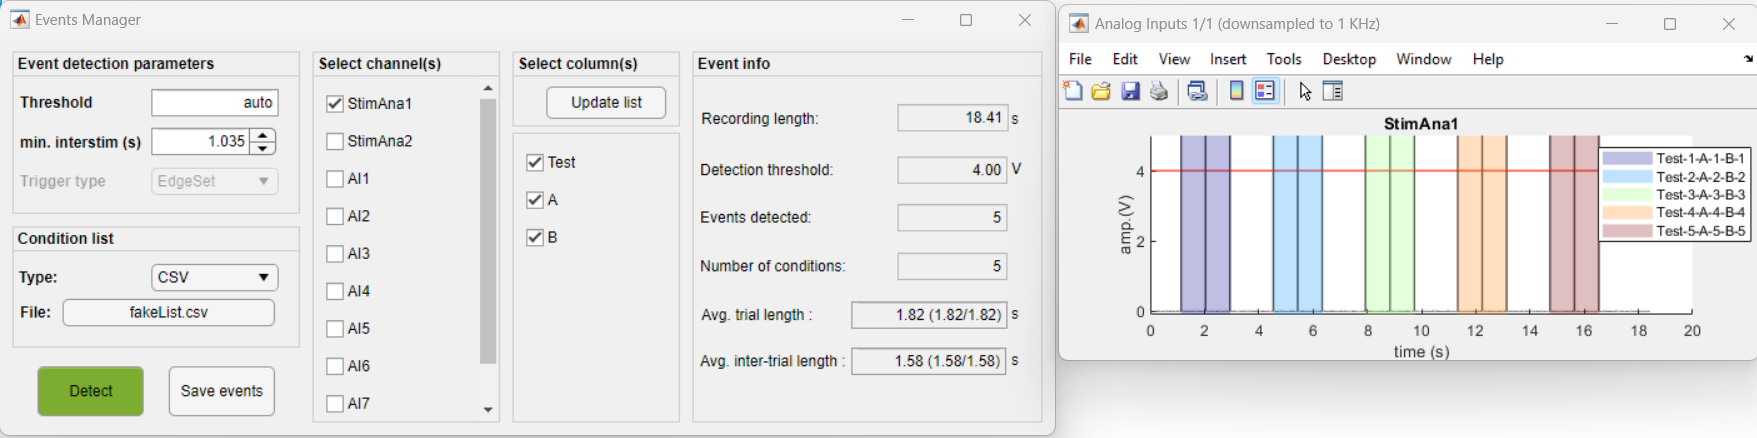
To update the event names, just select the desired columns and click on the Update list button.
Vpixx output file
For users that utilize the Vpixx software (Vpixx Technologies) to create stimuli, the app provides the option to parse the .vpixx or .txt files generated by the Vpixx software and updates the event name list.
The procedure for updating event names using .vpixx or .txtfiles generated by the Vpixx software is the same as for CSV files with a single column.
4. Save events
Finally, once all events are detected and the event names are updated from the condition file, simply click on the Save events button to save the event information to the events.mat file. This file contains all the information necessary for the analysis of event-triggered imaging data.